今天我们来看下如何搭建Springboot的多模块项目。
一、为什么要用多模块
一个模块分目录行不行,当然可以,但是这样会导致多个团队开发的时候混乱,会有很多冲突;如果根据领域设计将项目按照不同的领域进行划分,后续维护起来会方便很多;对于以后如果进行微服务的拆分也是很方便的,直接将对应的模块迁移成一个单独的服务即可;还有针对业务初期,可以考虑一个大的项目,不同的功能,比如商城,下单,支付分别建立不同的模块,后期如果业务发展迅速,直接拆分成对应的模块为微服务项目即可。
二、项目模块
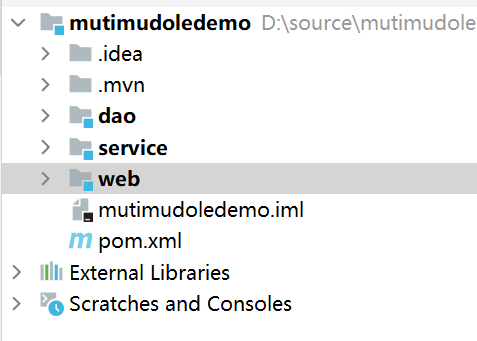
我们搭建的项目有以下几个模块:
dao 数据库操作模块
service 业务逻辑模块
web 前端模块
三、项目结构
项目结构如下:
四、搭建步骤
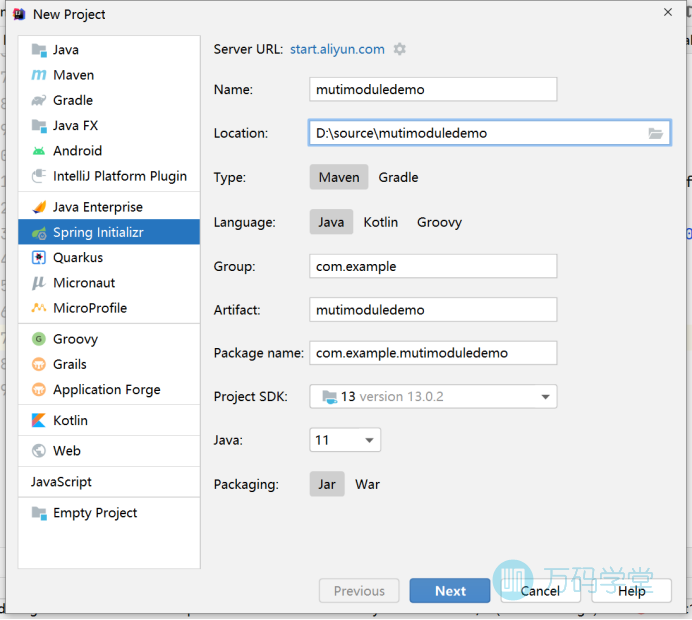
1、创建父项目
首先,创建一个父项目
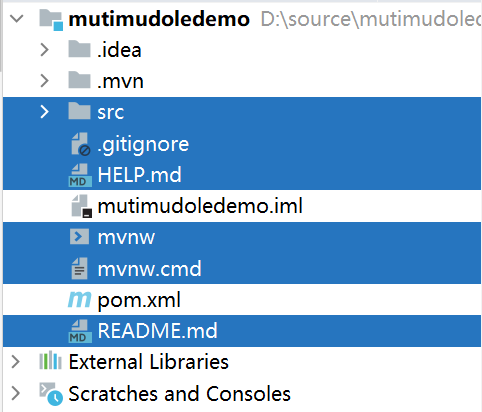
删除多余的文件
2、创建各个模块
在父项目上右键-New-Module,创建一个dao模块
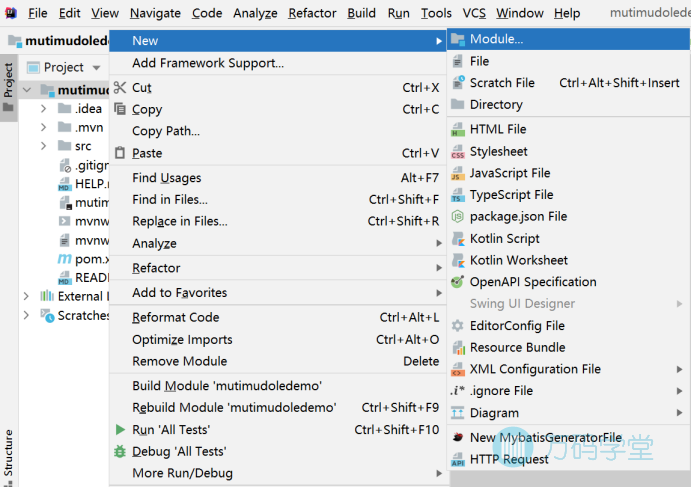
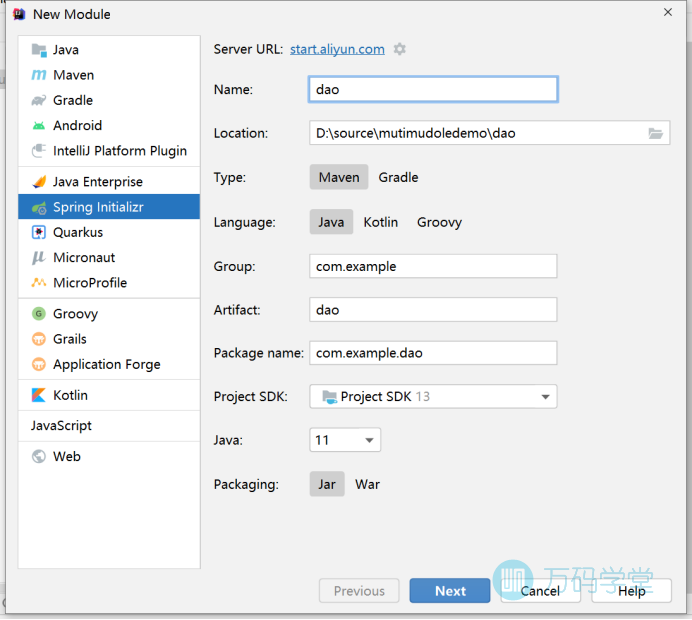
然后依次创建service和web等模块。
创建好以后的项目结构如下:
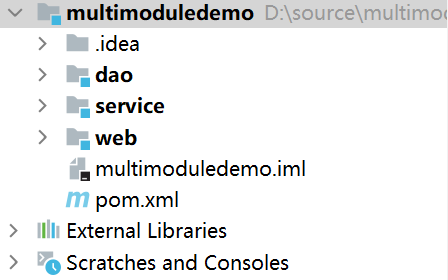
删除dao和service模块中的启动类xxxApplication,只保留web模块的启动类就可以了。
3、修改pom文件
首先修改父模块的pom文件,在pom文件中声明子模块,并声明打包类型为pom。(多模块项目中,父模块的打包方式必须是pom)
<packaging>pom</packaging>
<modules>
<module>dao</module>
<module>service</module>
<module>web</module>
</modules>
然后修改子模块的pom文件,在子模块中指定父模块。
<parent>
<artifactId>mutimudoledemo</artifactId>
<groupId>com.example</groupId>
<version>0.0.1-SNAPSHOT</version>
</parent>
在dao模块的pom文件中添加mysql、mybatis和lombok的依赖。
<dependency>
<groupId>org.mybatis.spring.boot</groupId>
<artifactId>mybatis-spring-boot-starter</artifactId>
<version>2.1.4</version>
</dependency>
<dependency>
<groupId>mysql</groupId>
<artifactId>mysql-connector-java</artifactId>
<version>8.0.18</version>
</dependency>
<dependency>
<groupId>org.projectlombok</groupId>
<artifactId>lombok</artifactId>
</dependency>
五、编写代码
1、新建数据库和表
这里我们使用Mysql数据库,首先在MySQL数据库中新建一个数据库和数据库表User,
表结构如下:

插入一条测试数据:

2、dao模块代码
(1)、添加实体类User
首先,添加一个实体类User,用于装载从数据库中查询的数据
@Data
public class User {
    private int id;
    private String username;
    private String password;
    private String name;
}
(2)、添加Mapper接口UserMapper,并添加一个方法findAll() 从数据库中查询所有的数据
@Mapper
public interface UserMapper {
    @Select("
select * from user
")
    List<User> findAll();
}
3、service模块代码
(1)、首先在pom文件中添加dao模块的依赖。
<dependency>
<groupId>com.example</groupId>
<artifactId>dao</artifactId>
<version>0.0.1-SNAPSHOT</version>
</dependency>
(2)、添加Service接口和实现类
首先添加接口UserService 并添加一个findAll()方法
public interface UserService {
    List<User> findAll();
}
然后添加接口的实现类UserServiceImpl
@Service
public class UserServiceImpl implements UserService {
    @Resource
    private UserMapper userMapper;
    @Override
    public List<User> findAll() {
        return userMapper.findAll();
    }
}
4、web模块代码
(1) 、首先在pom文件中添加service和dao模块的依赖
<dependency>
<groupId>com.example</groupId>
<artifactId>dao</artifactId>
<version>0.0.1-SNAPSHOT</version>
</dependency>
<dependency>
<groupId>com.example</groupId>
<artifactId>service</artifactId>
<version>0.0.1-SNAPSHOT</version>
</dependency>
(2) 、添加控制器UserController
@RestController
@RequestMapping("/user")
public class UserController {
    @Resource
    private UserService userService;
    @RequestMapping("list")
    public List<User> list(){
        return userService.findAll();
    }
}
(3)、在application.properties配置文件中添加数据库连接信息。
spring.datasource.url=jdbc:mysql://localhost:3306/jwt?useUnicode=true&characterEncoding=UTF-8&useSSL=false&serverTimezone=Asia/Shanghai
spring.datasource.username=root
spring.datasource.password=wanmait
spring.datasource.driver-class-name=com.mysql.cj.jdbc.Driver
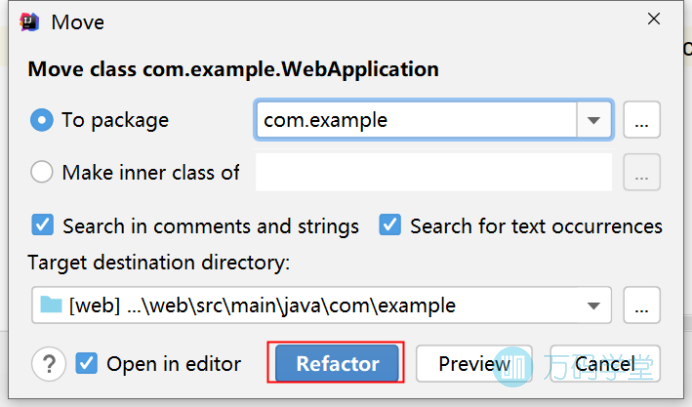
(4)、把WebApplication启动类移动到com.example包里面。
目前项目启动类 WebApplication在 com.example.web包下面,我们需要将其移动移动到 com.example 包下。
如果不移动启动类的话,在多模块项目中会可能会碰到一个模块无法通过 @Resource注入其他模块里的对象的问题。
移动的方式是在WebApplication上右键-Refactor-Move Class
六、开始测试
首先运行web模块下的启动类WebApplication

启动完成之后在浏览器中访问网址:
http://localhost:8080/user/list
就可以把数据库中的数据查询出来。

至此,Springboot多模块项目搭建并测试完成。


0条评论
点击登录参与评论